Android Date Time Setting Dialog
So, you want to allow the user to make a date and time selection in your application? Android provides independent date and time selection dialogs that we can use to accomplish this task.
Let’s first create the UI elements that will display the date and time after the selection has been made. This simple layout contains two buttons, one with the date and one with the time.
<?xml version="1.0" encoding="utf-8"?>
<LinearLayout xmlns:android="http://schemas.android.com/apk/res/android"
	android:orientation="vertical" android:layout_width="fill_parent"
	android:layout_height="fill_parent">
	<LinearLayout android:orientation="horizontal"
		android:layout_width="fill_parent"
		android:layout_height="wrap_content">
		<Button android:layout_width="fill_parent"
			android:layout_height="wrap_content"
			android:id="@+id/btn_set_date"
			android:layout_weight="2" />
		<Button android:layout_width="fill_parent"
			android:id="@+id/btn_set_time"
			android:layout_height="wrap_content"
			android:layout_weight="2" />
	</LinearLayout>
</LinearLayout>
Now, we can move on to making the dialogs appear and setting the date and time.
package com.austinrasmussen.blog.datetime;

import java.text.SimpleDateFormat;
import java.util.Calendar;

import android.app.*;
import android.app.DatePickerDialog.OnDateSetListener;
import android.app.TimePickerDialog.OnTimeSetListener;
import android.os.Bundle;
import android.view.View;
import android.widget.*;

public class BlogAndroidDateTimeActivity extends Activity {

	private Calendar dateTime = Calendar.getInstance();
	private SimpleDateFormat dateFormatter = new SimpleDateFormat(
			"MMMM dd, yyyy");
	private SimpleDateFormat timeFormatter = new SimpleDateFormat(
			"hh:mm a");

	private static final int DIALOG_DATE = 1;
	private static final int DIALOG_TIME = 2;

	private Button datePicker;
	private Button timePicker;

	@Override
	public void onCreate(Bundle savedInstanceState) {
		super.onCreate(savedInstanceState);
		setContentView(R.layout.main);

		datePicker = (Button) findViewById(R.id.btn_set_date);
		datePicker.setText(dateFormatter.format(dateTime.getTime()));
		datePicker.setOnClickListener(new View.OnClickListener() {
			public void onClick(View v) {
				showDialog(DIALOG_DATE);
			}
		});

		timePicker = (Button) findViewById(R.id.btn_set_time);
		timePicker.setText(timeFormatter.format(dateTime.getTime()));
		timePicker.setOnClickListener(new View.OnClickListener() {

			public void onClick(View v) {
				showDialog(DIALOG_TIME);
			}
		});
	}

	@Override
	protected Dialog onCreateDialog(int id) {
		switch (id) {
		case DIALOG_DATE:
			return new DatePickerDialog(this, new OnDateSetListener() {

				@Override
				public void onDateSet(DatePicker view, int year,
						int monthOfYear, int dayOfMonth) {
					dateTime.set(year, monthOfYear, dayOfMonth);
					datePicker.setText(dateFormatter
							.format(dateTime.getTime()));
				}
			}, dateTime.get(Calendar.YEAR),
			   dateTime.get(Calendar.MONTH),
			   dateTime.get(Calendar.DAY_OF_MONTH));

		case DIALOG_TIME:
			return new TimePickerDialog(this, new OnTimeSetListener() {

				@Override
				public void onTimeSet(TimePicker view, int hourOfDay,
						int minute) {
					dateTime.set(Calendar.HOUR_OF_DAY, hourOfDay);
					dateTime.set(Calendar.MINUTE, minute);
					timePicker.setText(timeFormatter
							.format(dateTime.getTime()));

				}
			}, dateTime.get(Calendar.HOUR_OF_DAY),
			   dateTime.get(Calendar.MINUTE), false);

		}
		return null;
	}
}
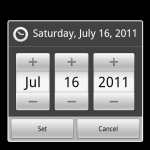
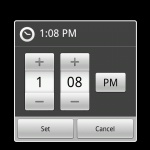
This will cause a date picker dialog to appear when the button containing the date is clicked. Likewise, it will cause a time picker dialog to appear when the button containing the time is clicked.
The dateTime calendar object is then updated with the selected values and can be used throughout the application.
This entry was posted on Saturday, July 16th, 2011 at 1:19 pm and is filed under Android. You can follow any responses to this entry through the RSS 2.0 feed. You can leave a response, or trackback from your own site.


